

Having studied systems information at university, I have always looked at web performance from the bare metal up. In 2015, I founded Coodiv. Over the past decade, my team has built more than 3,000 custom web platforms, Laravel systems, Node.js backends, mobile apps, and WordPress sites. We also run our own high-traffic publishing properties every single day. If managing thousands of production servers taught us one hard lesson, it’s simple: most people optimize WordPress completely backwards.
Here is what usually happens. Your mobile traffic spikes. The site slows down. You run a quick test on Google PageSpeed Insights, see a score of 32 in bright red, and panic. So you install three different caching plugins. You check every box you can find: minification, script delays, aggressive preloading. You refresh. Nothing improves. Instead, your checkout button stops responding and your mobile menu freezes. Worst of all, your Time to First Byte stays terrible because your server still burns 800ms running bloated PHP scripts and unindexed MySQL queries before sending back a single byte of HTML. Tweaking CSS won’t fix that.
Real speed isn’t about stacking plugins. It’s about systems architecture. To achieve passing Core Web Vitals, you need a disciplined framework: first measure an honest baseline, then resolve server and script bottlenecks in the order the browser actually executes them, and finally verify real-user field data in Google Search Console.
The 3-Step WordPress Speed Optimization Framework is a systematic performance engineering workflow designed to achieve passing Core Web Vitals (sub-50ms TTFB, sub-2.5s LCP, sub-200ms INP, and <0.1 CLS) across 28-day CrUX real-user visits:
- 1. Baseline Diagnostics: Distinguishing synthetic lab simulations from real-user field metrics to isolate TTFB, LCP, INP, and CLS bottlenecks.
- 2. Categorized Engineering Fixes: Applying Layer 1 zero-PHP server rewrites to cut TTFB under 50ms, inlining above-the-fold Critical CSS, converting media to WebP and AVIF (-80% payload), and task-slicing JavaScript with
scheduler.yield(). - 3. Field Verification: Tracking 75th-percentile real-user distributions in Google Search Console to guarantee persistent sub-second speed without layout shifts or WooCommerce checkout breakage.
Unlike legacy plugin stacking that introduces JavaScript race conditions, this 3-step system delivers sustainable sub-second load times across mobile viewports.
Table of Contents
Step 1: Testing the Website & Establishing Baselines
Before you touch a single line of code or install another tool, stop. You need an honest baseline. Don’t guess. Head over to Google PageSpeed Insights and run your site through the test. Because Google officially uses Core Web Vitals as a ranking factor, the numbers you see here directly impact your search visibility. And if you’re not sure what all the diagnostics mean, don’t worry. Our Google PageSpeed Insights Guide breaks down every section in plain English.
- Keep your baseline open: Leave that initial PageSpeed Insights tab open. You’ll want an exact side-by-side comparison once you start applying fixes.
- Don’t confuse Lab data with Field data: Lighthouse Lab scores give you a quick simulated snapshot. But the Chrome User Experience Report (CrUX) is what Google actually evaluates. It tracks the 75th percentile of real human visits over 28 rolling days.
- Pinpoint the real bottlenecks: Dig into the Opportunities and Diagnostics tabs to see exactly what is slowing you down, whether it is high TTFB, heavy uncompressed images, or render-blocking scripts.
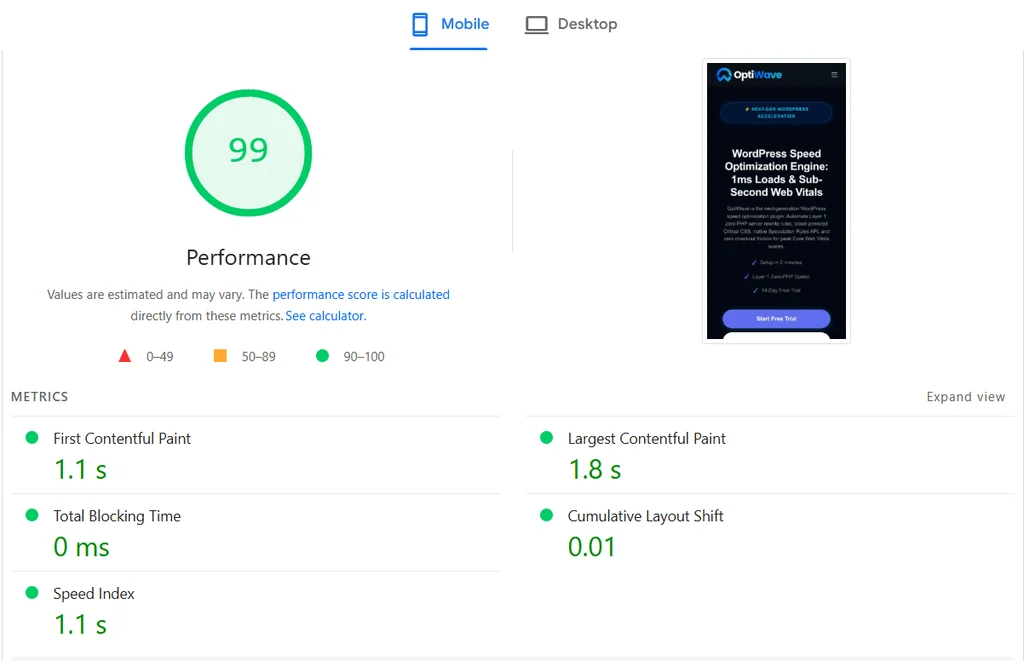
| Core Metric | Official Target (75th Percentile) | What It Measures |
|---|---|---|
| LCP (Largest Contentful Paint) | ≤ 2.5 seconds | Visual loading performance of the main viewport element. |
| INP (Interaction to Next Paint) | ≤ 200 milliseconds | Overall page responsiveness to clicks, taps, and keyboard inputs. |
| CLS (Cumulative Layout Shift) | ≤ 0.1 | Visual stability and unexpected element movement on screen. |
| TTFB (Time to First Byte) | < 200 milliseconds | Initial server response time and network connection latency. |
Step 2: Fixing WordPress Speed Optimization Issues (Categorized Solutions)
Once you’ve got your baseline numbers, it’s time to tackle the bottlenecks. But don’t just jump into random settings. We’ve organized the fixes below into clear architectural categories so you can knock them out in the exact order the browser processes your pages.

2.1 Core Web Vitals in WordPress
Mastering Core Web Vitals in WordPress requires passing three strict metrics measured directly from real user Chrome sessions. Google doesn’t grade your site on a curve. Ever since Interaction to Next Paint (INP) officially replaced First Input Delay in March 2024, passing these thresholds has become significantly tougher, especially on mobile viewports. Google analyzes the 75th percentile of your visitors, meaning three out of four real-world visits have to clear the bar. OptiWave tackles this head-on with Cloud LCP Priority preloading, 3-way JavaScript execution control (Defer, Idle, Delay), and automated layout stabilization so you don’t have to spend hours writing custom scripts.
| Script Execution Tier | Target Script Types | Browser Scheduling & INP Impact |
|---|---|---|
| 1. Critical Defer | Core theme UI navigation, critical menu handlers, and jQuery dependencies | Executes sequentially right after HTML parsing; guarantees immediate layout interactivity without blocking initial render. |
| 2. Idle Execution | Non-critical tracking, analytics beacons, form validation scripts | Executed via native requestIdleCallback during idle browser frames; prevents main-thread long tasks over 50ms. |
| 3. Interaction Delay | Live chat widgets, reCAPTCHA, third-party marketing tags, social embeds | Postponed until first user input (touch, scroll, or keypress); completely eliminates main-thread input delay for passing INP under 200ms. |
- How to Optimize Largest Contentful Paint (LCP) in WordPress: Learn how to measure rendered on-screen area, assign
fetchpriority="high", and preload hero images. - How to Fix Interaction to Next Paint (INP) in WordPress: Master main-thread task slicing, 3-way script execution (Defer/Idle/Delay), and third-party script isolation.
- How to Fix Cumulative Layout Shift (CLS) in WordPress: Eliminate layout jumps by setting intrinsic aspect ratios and fallback font metric overrides (
size-adjust). See also: Fix Font Swap Layout Shifts.
2.2 Render-Blocking Resources
When a browser hits your site, it stops dead in its tracks the moment it finds an external stylesheet or synchronous script in the header. It won’t paint a single pixel until those files are completely downloaded and parsed. Nothing renders. The browser just waits. That’s what Google calls “render-blocking.” Extracting above-the-fold Critical CSS by hand is brutal. You are stuck running Node.js build tools, maintaining selector safelists, and praying that a theme update doesn’t trigger a jarring flash of unstyled content (FOUC). OptiWave handles this completely behind the scenes with Cloud Critical CSS. A cloud-based headless browser analyzes your actual mobile viewport, generates pixel-perfect critical styles, inlines them directly into the HTML, and defers everything else. Want the full technical deep dive? Check out our Cloud Critical CSS Guide.
- How to Eliminate Render-Blocking Resources in WordPress: Extract above-the-fold Critical CSS, asynchronously defer secondary theme stylesheets, and self-host web fonts.
2.3 Image & Media Optimization
Images are almost always the heaviest part of any WordPress page. They dominate page weight. It’s shockingly easy for a few uncompressed PNGs or hero banners to bloat a page to 4MB or more. That’s massive. And if you embed a YouTube video? That single iframe dumps over 1MB of third-party JavaScript before a visitor even hits play. It’s brutal on mobile. OptiWave strips out that dead weight automatically: it converts uploads into next-gen WebP and AVIF formats, auto-injects missing width and height attributes to stop layout shifts, swaps out heavy YouTube embeds for feather-light 15KB image facades, and prioritizes your hero image so it renders immediately.
- The Complete WordPress Image Optimization Guide (WebP, AVIF & Lazy Loading): Convert uploads to modern AVIF/WebP formats, auto-inject missing dimensions, and replace heavy YouTube iframes with 15KB thumbnail facades.
2.4 Server Response Time & TTFB
Think of Time to First Byte (TTFB) as your site’s foundation. If your server takes 800ms just to send back the first byte of HTML, your LCP metric is dead in the water before the browser even starts parsing code. Most caching plugins rely on PHP drop-in scripts. The problem? They still boot up WordPress and check database connections on every single request. Writing rewrite rules by hand is possible. But one tiny typo in your .htaccess or Nginx config knocks your entire site offline with a 500 internal server error. OptiWave takes a different approach: it uses Layer 1 zero-PHP server rewrites. Your web server (Apache, Nginx, or LiteSpeed) serves pre-cached static HTML straight from disk in 1 to 5ms. PHP and MySQL are never even touched. Zero runtime overhead. It’s that clean.
Because OptiWave pre-compresses pages with Brotli and Gzip right when the cache file is created, your server streams static bytes instantly with zero runtime CPU overhead. If you want to push speed even further, pair this with global edge delivery using our Cloudflare Edge Caching Guide, or read our technical breakdown on why server rewrite rules deliver 1ms page loads.
| Architecture Layer | Layer 1 Server Rewrite Rules | Standard PHP Cache Plugins |
|---|---|---|
| PHP Boot Overhead | 0 ms (Completely bypassed) | 20 to 80 ms per request |
| Database Queries | 0 queries (Direct disk file stream) | 1 to 4 cache verification queries |
| Server Response Time (TTFB) | 1 to 5 ms | 30 to 120 ms runtime buffer delay |
| Compression Strategy | Write-Time Pre-Compressed (Brotli 11 & Gzip 9) | Runtime on-the-fly CPU compression |
| Concurrency at 1,000 req/s | < 5% CPU usage (Scales effortlessly) | 80 to 100% CPU (Worker pool exhaustion) |
2.5 Unused Code & Bloat Removal
Out of the box, WordPress is surprisingly noisy. Very noisy. Even a fresh install loads emoji scripts, oEmbed tags, XML-RPC links, and frontend Dashicons, even when visitors aren’t logged in. None of this helps users. But it all piles onto mobile network requests. OptiWave gives you 11 dedicated bloat removal toggles to strip out those unnecessary core scripts safely. Plus, its Cloud Critical CSS engine scrubs unused stylesheet rules while keeping interactive components like dropdown menus, sliders, and modals completely functional.
- How to Remove Unused CSS and Clean WordPress Code: Safely remove unused CSS with cloud validation and strip 11 core WordPress bloat items (emojis, oEmbeds, RSD, Dashicons).
2.6 Minification & Text Compression
Every single kilobyte you shave off your CSS and JavaScript files is a kilobyte mobile visitors don’t have to wait for over spotty 4G connections. Every byte counts. But aggressive minification can easily break site layouts or trigger JavaScript syntax errors. OptiWave handles minification safely: it cleans up whitespace and comments without mangling modern block editor code, then pre-compresses files at Brotli Level 11 and Gzip Level 9. Your server simply hands the compressed file to the browser without burning server CPU cycles on the fly. It’s fast. And it scales.
- Brotli & Gzip Pre-Compression: Pre-compress cached static files at write time (Brotli Level 11 and Gzip Level 9) so web servers stream pre-compressed bytes with zero runtime CPU burn.
- Safe CSS & JS Minification: Strip comments and whitespace while preserving syntax integrity for block editor compatibility.
2.7 Database & Background Maintenance
Over months and years, your WordPress database quietly gathers clutter. It’s inevitable. Post revisions, old auto-drafts, spam comments, and expired transients quietly pile up inside your wp_options and wp_posts tables. The result? Queries take longer to run, and dynamic server response times creep upward. OptiWave includes a built-in Database Cleanup tool. You can clear out that junk in one click, or set automated background cron jobs to keep your database lean, purge orphaned transients, and run table optimizations without needing phpMyAdmin.
- Clean Expired Transients & Revisions: Periodically purge stale cache entries from
wp_optionsand limit post revisions to a maximum of 3.
2.8 Instant Navigation & Prefetching
What if you could make page loads feel truly instant? That’s exactly what the modern Speculation Rules API does. Instead of waiting for a visitor to click a link, the browser quietly prefetches or prerenders the next page the second their cursor hovers over it. By the time they actually click, the page is already sitting in browser memory. OptiWave builds this browser-native feature right in, configured with smart eagerness settings so visitors get near-instant 0ms navigation across your internal pages without overloading your server.
- Instant Navigation: How Speculation Rules API Achieves 0ms Page Loads: Deep-dive into the browser-native JSON Speculation Rules API, eagerness levels, and how OptiWave automates prefetching without developer configuration.
Manual Optimization vs. OptiWave Autopilot
You can certainly configure each of these optimizations manually. But before you lose an entire weekend debugging script conflicts and server config files, it helps to look at the real-world trade-offs between doing everything piecemeal versus running an integrated performance engine:
| Performance Factor | Manual Piecemeal Optimization | OptiWave Autopilot Suite |
|---|---|---|
| Plugin Footprint | 4 to 7 separate plugins (caching, images, minification, database, font hosting) | 1 unified plugin (< 500KB) with zero overlapping overhead |
| Server Caching | Requires manually editing sensitive .htaccess or Nginx configuration files | Automated Layer 1 rewrites with 1-click toggles and instant rollback safety |
| Critical CSS | Requires Node.js CLI build tools; frequently breaks layouts when themes update | Cloud Critical CSS extracted and validated in headless Chrome automatically |
| E-Commerce Safety | High risk of caching checkout pages or delaying vital payment scripts | Automatic WooCommerce protection for carts, checkouts, and dynamic fragments |
| Conflict Prevention | Frequent white screens of death and double output buffer collisions | Built-in 38+ conflict detector alerts you to overlapping plugins before activation |
| Time to Green Scores | 15 to 30 hours of manual testing, CSS tweaking, and script debugging | Under 3 minutes to activate, test, and achieve sub-second load times |
Step 3: Re-Testing & Verifying Real-User Field Data
Once you’ve put your optimizations in place, don’t just assume everything is faster. Prove it. Head back to Google PageSpeed Insights and verify the impact of your changes:
- Compare fresh test runs: Re-test your URL in PageSpeed Insights and check your new LCP, TTFB, and overall score against the baseline tab you left open.
- Test in a clean incognito window on mobile: Open your site on an actual mobile device in private browsing mode. Confirm that layouts don’t shift, fonts look crisp, and interactive elements respond instantly.
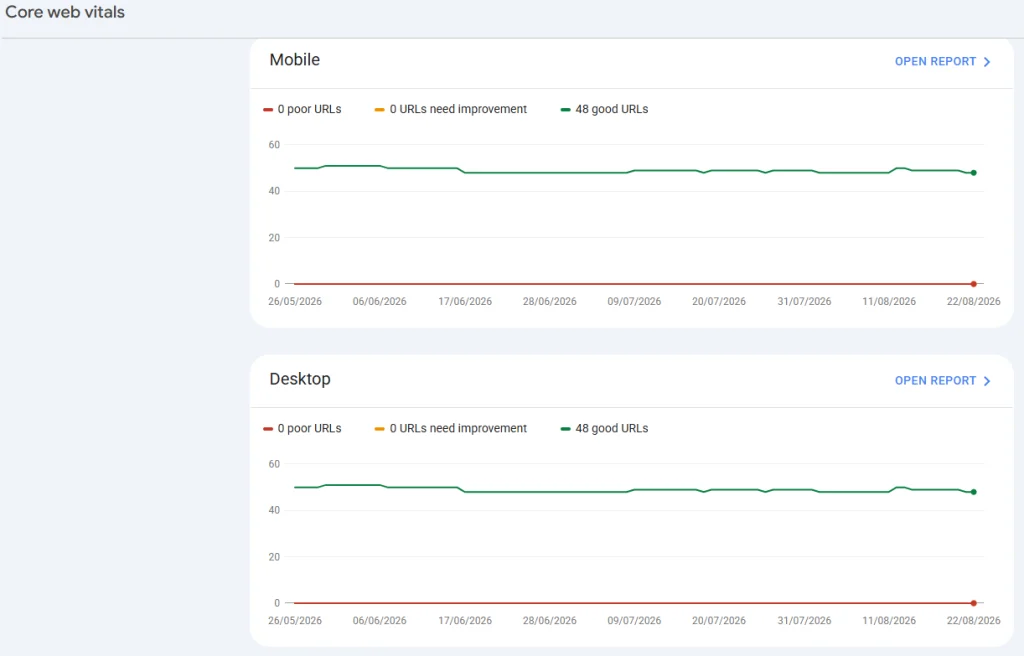
- Track 28-day CrUX trends in Search Console: Keep an eye on your Core Web Vitals report in Google Search Console. As real visitors browse your newly optimized pages over the next 28 days, your passing URL percentage will steadily climb.
Common WordPress Speed Optimization Mistakes
Even seasoned developers fall into speed optimization traps. Chasing a 100 PageSpeed score is great. But breaking your store isn’t. Watch out for these common missteps:
- Delaying every single JavaScript file: It’s tempting to delay all scripts to get a quick 100 on mobile, but doing so will break WooCommerce checkout buttons, cart drawers, and contact forms. OptiWave automatically detects WooCommerce pages and disables script delays on cart and checkout flows so your sales are never interrupted.
- Caching pages for logged-in users: Nothing destroys user trust faster than showing one customer another user’s cart or profile dashboard. Always ensure your caching engine completely bypasses cached pages for authenticated user sessions and active checkout cookies.
- Stacking multiple caching plugins: More isn’t better. Running two or three optimization plugins at the same time creates output-buffering race conditions, duplicate headers, and fatal PHP errors. Stick with one integrated engine that handles caching, minification, and critical CSS in a single unified pipeline.
- Chasing synthetic lab scores while ignoring field data: A simulated 99 score in Lighthouse looks great in a screenshot, but it won’t help your SEO if real visitors on sluggish mobile connections struggle. Google ranks you on 28-day real-world CrUX data in Search Console. Always prioritize field metrics over one-off lab tests.
- Lazy-loading your hero (LCP) image: If your largest above-the-fold image has
loading="lazy"on it, the browser waits until page layout is calculated before it even starts downloading it. That adds hundreds of milliseconds to your LCP. Always exclude above-the-fold hero images from lazy loading and give themfetchpriority="high"instead. - Concatenating CSS and JavaScript into giant bundles: In the old HTTP/1.1 days, combining everything into one massive file made sense. Under modern HTTP/2 and HTTP/3 multiplexing, it actually slows things down: one small CSS update invalidates your entire site cache, and the browser can’t parallelize asset downloads.
- Breaking single posts into multiple pages: Using
<!--nextpage-->pagination just to artificially lower DOM size irritates mobile readers, drives up bounce rates, and splinters your internal search rankings. Keep your content unified and optimize your DOM by trimming unused DOM elements instead.
What is the correct order to optimize WordPress for PageSpeed?
Follow a systematic 3-step sequence: 1. Establish baseline performance metrics in Google PageSpeed Insights, 2. Deploy architectural fixes in order (Layer 1 Server TTFB -> Render-blocking Critical CSS -> Image optimization & WebP/AVIF -> 3-way JavaScript execution scheduling), and 3. Re-test and monitor 28-day rolling CrUX field data in Google Search Console.
Why did Google replace FID with INP?
First Input Delay (FID) only captured the input delay of the very first user interaction and completely ignored callback processing time and subsequent frame rendering. Interaction to Next Paint (INP) measures the total latency (input delay, processing duration, and presentation delay) across every click, tap, and keypress throughout the entire user session, providing a far more rigorous measure of perceived responsiveness.
How do I know if my optimizations are working for real users?
Google PageSpeed Insights reports both synthetic Lab Data (Lighthouse simulations) and 28-day rolling Field Data via the Chrome User Experience Report (CrUX). While lab scores give instant diagnostic feedback, Google search ranking algorithms prioritize the 75th percentile of real-user field visits visible in the Google Search Console Core Web Vitals report.
Will speed optimization plugins break my WooCommerce store?
Generic speed plugins often cause broken carts, blank checkout pages, and failed payment modals when they blindly delay all JavaScript or cache dynamic customer endpoints. OptiWave avoids this through built-in WooCommerce protection: cart and checkout URLs are automatically excluded from page caching, dynamic customer cart fragments bypass buffering, and checkout JavaScript skips interaction delays entirely.